Category Archives: hacks


Refurbished filament transformer
Nada super original, antes era un trafo de 500W para lámparas dicroicas. Ahora sirve para probar (casi) todo tipo de válvulas, le bobiné secundarios de 12.6, 6.3, 2.5 y 5 todos con punto medio. Con este alimenté a la 866 que subí a wikimedia. Me tomó unas cuatro horas.
Algunas fotos del proceso…
-
- Transformador de lamparas dicroicas rebobinado para filamentos de valvulas. 6.3Vct, 12.6Vct, 5V, 2.5V. 500W total. Antes
-
- Transformador de lamparas dicroicas rebobinado para filamentos de valvulas. 6.3Vct, 12.6Vct, 5V, 2.5V. 500W total. Laminaciones
-
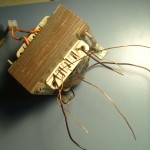
- Transformador de lamparas dicroicas rebobinado para filamentos de valvulas. 6.3Vct, 12.6Vct, 5V, 2.5V. 500W total. Finalizado
Dumpster diving 1
Es increíble la cantidad de cosas útiles que la gente tira. Hace unos días me encontré una lámpara fluorescente con tubo y todo. Estaba bastante sucia y tiene marcas de quemaduras, pero funciona! Debe haber sido cara en su momento, el balasto es italiano posta (MagneTek – Made in Italy)


SAA1027 pic replacement
Quick hack to replace a burned chip.

SAA1027 replaced with a pic microcontroller
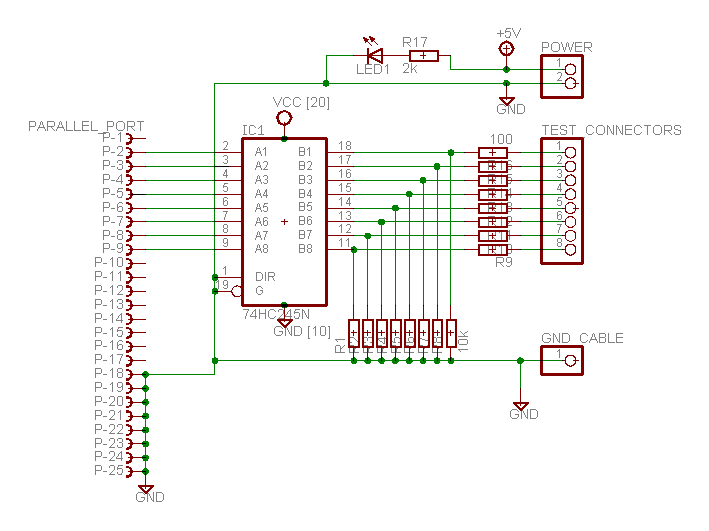
Cheap logic analyzer.
Just a very simple analyzer based on this circuit http://www.akikorhonen.org/uploaded/2008/05/logic_analyzer_schematic.png
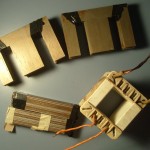
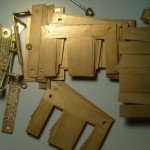
Added a jumper to use it as an output port. The centronics, flat cable and some other things came from and old Epson printer. It’s working relly nice using TFLA (‘The Fabulous Logic Analyzer’) as software backend, found at http://tfla-01.berlios.de/
Look ma’ cardboard!

Logic analyzer

Logic analyzer
Using a cheap USB to Parallel adapter to controll stuff.
Whenever I have to control something I ssh into my desktop and work there, mostly because lately I turned a bit lazier (coding from the couch is really nice) and because I had to get rid of its screen for a while. Well, the hard disk is dying so I had to find a substitute till I buy a new one. Sometimes I don’t understand technology; that WD is at most three years old and smartd starts complaining. The Seagates in our router/print server/etc. have easily ten years spinning without a whine.
Enough ranting. Picked up a “Noganet” branded usb to parallel cable that was lurking in the basement. It appeared under Linux as /dev/usblp0 as expected (never saw one that really really implements a real parallel port). Trying to write to it resulted in a hang (the program was waiting for i/o) but pluggin a printer an cat’ing something resulted in a printed page. According to this page on BeyondLogic,
Centronics is an early standard for transferring data from a host to the printer. The majority of printers use this handshake. This handshake is normally implemented using a Standard Parallel Port under software control. Below is a simplified diagram of the `Centronics’ Protocol. […] Centronics Waveform Data is first applied on the Parallel Port pins 2 to 7. The host then checks to see if the printer is busy. i.e. the busy line should be low. The program then asserts the strobe, waits a minimum of 1uS, and then de-asserts the strobe. Data is normally read by the printer/peripheral on the rising edge of the strobe. The printer will indicate that it is busy processing data via the Busy line. Once the printer has accepted data, it will acknowledge the byte by a negative pulse about 5uS on the nAck line.
Quite often the host will ignore the nAck line to save time
So, I tied Busy(11) to ground and tried again. Success!!
From C everything is roses,
#include <fcntl.h>
#include <stdlib.h>
#include <stdio.h>
/* not a single error check, will blow out very nice */
int main(int argc, char **argv)
{
    int fd = open("/dev/usblp0", O_WRONLY);
    char d = (char) atoi(argv[1]);
    write(fd, &d, 1);
    close(fd);
}
But not so with Python. I forgot to set the file to unbuffered, it wrote everything at once when exiting or flushing. The solution is to use something like
port = open('/dev/usblp0', 'wb', 0)
and you are all set to go.
It worked, somehow. The usb bus has a limit of 1000 packets per second, this means you can at most flip bits at that rate. It should work in other (faster) modes and allow me to read but haven’t figured yet how to do it, all I get now are non-working IOCTLS. Maybe the adapter is way cheaper than what I thought.
Tecnología tercermundista, amplificador distribuidor para mezclas. Maña I
El otro dia en la radio abierta surgió que varias personas necesitaban monitorear la mezcla final y la consola solo tiene una salida de auriculares, el resto no cuenta con potencia suficiente. Previendo que se repetiría decidí construir un pequeño amplificador.
Materiales:
- Unidad de cdrom / dvd / etc rota.
- Cable de audio.
- Plugs y jacks.
- Cable usb (obtenido de un ratón roto)
- Cartón, cinta de embalar y demás cosas de bricolage en cantidad necesaria
Antes que nada desarmar la unidad de cd/dvd y quitar la plaqueta del frente, en todas las unidades de descarte que tengo esta contiene un amplificador con su control de volumen.

Amplificador extraído de una unidad de cdrom
Decidirse respecto a las conexiones necesarias. En mi caso necesitaba dos jacks amplificados y dos directos de consola.
Alimentación; normalmente hay casi tantas computadoras como personas y la placa que reciclé funciona a 5V, así que opté por usar un puerto usb para alimentarla.
Investigar un poquito como va conectada la plaqueta, decidir como montar el resto de los conectores. En mi caso contaba con algo de tiempo y fabriqué otro impreso. Como no tenía resistencias mas o menos chiquititas conecté las dos salidas de auricular en paralelo pero no es algo muy bueno que digamos.

Conexionado del amplificador

Plaqueta auxiliar con los conectores
Soldar todo, rematar con cartón y cinta transparente a gusto. Son increíble las cosas que pueden arreglarse con velcro y cinta. Próximamente hackmeetings en Utilísima Satelital…

Amplificador terminado
Funciona bastante bien, para no estar blindado capta poco ruido de la instalación eléctrica aunque no sirve mucho (aún) para usarlo de pre con el bajo.