Volví a meter parches.
Volví a escuchar a Björk.
Volví a llorar.
Volví a bailar.
Volví a comer galletas de miel acompañadas de un carajillo.
Sigo siendo el mismo boludo de siempre, solo algo mas tibio.
Volví a meter parches.
Volví a escuchar a Björk.
Volví a llorar.
Volví a bailar.
Volví a comer galletas de miel acompañadas de un carajillo.
Sigo siendo el mismo boludo de siempre, solo algo mas tibio.
This is more or less a direct translation of the examples found at gstreamer/tests/examples/controller/*.c to their equivalents using the gi bindings for Gstreamer under Python. The documentation can be found here. Reading the source also helps a lot.
The basic premise is that you can attach a controller to almost any property of an object, set an interpolation function and give it pairs of (time, value) so they are smoothly changed. I’m using a pad as a target instead of an element just because it fits my immediate needs but it really can be any Element.
First you need to import Gstreamer and initialize it:
#!/usr/bin/python

import gi

import sys

from gi.repository import GObject

gi.require_version('Gst', '1.0')

from gi.repository import Gst

from gi.repository import GstController

from gi.repository import Gtk

from gi.repository import GLib
GObject.threads_init()
Gst.init(sys.argv)
Then create your elements. This is by no means the best way but lets me cut a bit on all the boilerplate.
p = Gst.parse_launch ("""videomixer name=mix ! videoconvert ! xvimagesink

videotestsrc pattern="snow" ! videoconvert ! mix.sink_0

videotestsrc ! videoconvert ! mix.sink_1

""")
m = p.get_by_name ("mix")
s0 = [pad for pad in m.pads if pad.name == 'sink_0'][0]
s0.set_property ("xpos", 100)
Here I created two test sources, one with bars and another with static that also has an horizontal offset. If we were to start the pipeline right now ( p.set_state (Gst.State.PLAYING) ) we would see something like this:
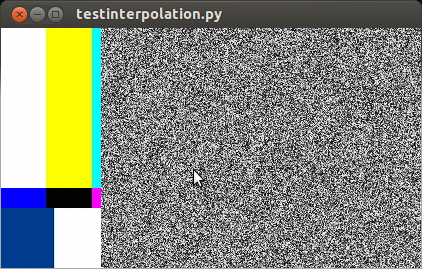
So far it works. Now I’d like to animate the alpha property of s0 (the sink pads of a videomixer have interesting properties like alpha, zorder, xpos and ypos). First we create a control source and set the interpolation mode:
cs = GstController.InterpolationControlSource()

cs.set_property('mode', GstController.InterpolationMode.LINEAR)
Then we create a control binding for the property we want to animate and add it to our element:
cb = GstController.DirectControlBinding.new(s0, 'alpha', cs)

s0.add_control_binding(cb)
It is worth noting that the same control source can be used with more than one control binding.
Now we just need to add a couple of points and play:
cs.set(0*Gst.SECOND, 1)

cs.set(4*Gst.SECOND, 0.5)

p.set_state (Gst.State.PLAYING)
If you are not running this from the interpreter remember to add GObject.MainLoop().run() , otherwise the script will end instead of keep playing. Here I’ve used absolute times, to animate in the middle of a playing state you need to get the current time and set the points accordingly, something like this will do most of the cases:
start = p.get_clock().get_time() # XXX: you better check for errors

end = start + endtime*Gst.SECOND
You can get the controller and control source of an element with:
control_binding = element.get_control_binding('property')

if control_binding:

    control_source = control_binding.get_property('control_source')
So, last week we bought an HP AIO 520-1188 to use with Tetra. It is a really nice machine, wonderful sound and display quality, very easy to disassemble. It came with an integrated tv tuner, infrared control and wireless keyboard and mouse. Strangely, it used only the necessary amount of packaging.
To actually use the touchscreen one needs to install the nwfermi packages found at https://launchpad.net/~djpnewton.
The kernel driver is managed with dkms, for it to build I replaced the ocurrences of err with pr_err and commented out the call to dbg(). The sources are installed by default at /usr/src/nwfermi-0.6.5.0. After that changes do a
dkms build -m nwfermi -v 0.6.5.0

dkms install -m nwfermi -v 0.6.5.0
The xorg input driver needs to be recompiled as the last version on the ppa is for a different ABI version of Xorg. I grabbed the sources from https://launchpad.net/~djpnewton/+archive/xf86-input-nextwindow/+packages.
The requisites to build it are installed with:
apt-get install build-essential autoconf2.13 xorg-dev xserver-xorg-dev xutils-dev
(In the guide it says to install xorg-x11-util-macros, its contents are now in xutils-dev)
After that do
chmod +x autogen.sh ; ./autogen.sh

make

make install
The old (and nonworking) driver is still present, so we remove it:
rm /usr/lib/xorg/modules/input/nextwindow_drv.so
Reboot the system and you are set to go.
The provided debs worked fine with a stock Debian Wheezy.
I had no luck in making the userspace daemon work on a 64 bit distro (so for now I’m limited to a tad less than 4G of ram), but I think it’s a matter of time.
For a little more than a month I was working with GStreamer on a cool project. Almost everybody told me that GStreamer is really nice if all you want to build is a player but things tend to get difficult really soon for other uses.
For the first week I struggled to do even the simplest stuff but after that it became quite manageable and I barely had to think. Except when dealing with dynamically removing and adding elements. And renegotiation errors. Fuck. I remove a source. I add another one, exactly like the former, and bam! “streaming task paused, reason not-negotiated (-4)”. Bummer. I resorted to go PLAYING – READY – PLAYING but it feels plainly wrong.
Also, I don’t know the difference between sinc, sync and sink anymore.
El jueves con los compañeros de Crear estuvimos en la CISL con nuestra charla. Es de no creer que gente del público en tiempo real twiteaba y subía la charla a youtube entre otras cosas.
Video corto del final: http://www.youtube.com/watch?v=h892afxo4ko
Twits: #guitarravasallorar
T!: http://www.taringa.net/posts/linux/12404725/Guitarra-vas-a-llorar_.html
En unas horitas me voy a la Conferencia Internacional de Software Libre a presentar con los Compañeros de Crear el prototipo de nuestro último proyecto, “Guitarra Vas a Llorar“.
La idea central es agregar un dispositvo electrónico a una guitarra estándar capaz de mostrar acordes, escalas y canciones sobre el diapasón. Mediante LEDs (diodos emisores de luz) se indicará en donde el guitarrista debe apoyar sus dedos. El funcionamiento se completa con dos alternativas de uso:
Más info del proyecto:
http://www.elarteylatecnologia.com.ar/spip.php?article60
Programa de la Conferencia Internacional de Software Libre:
http://www.cisl.org.ar/index.php?option=com_content&view=article&id=373&Itemid=466

 |
 |
Recién terminé de rutear la plaqueta para un proyectito que empezamos con Crear. Nada de otro mundo, un registro de desplazamiento, optoacopladores y triacs. Usé la suite gEDA junto con unos scripts de Kai-Martin-Knaak. En el portátil tarda algo para hacer el render “fotorealístico” pero para mostrar el producto aún antes de que exista son geniales.


Es el primer año que compito, en estas cuatro horas pasó lo siguiente:
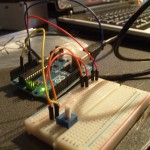
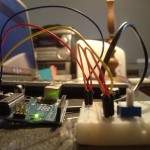
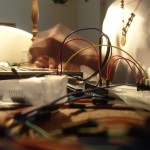
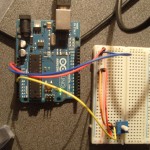
Hace un par de semanas con los compañeros de Crear compramos un Arduino (y un montón mas de cosas en adafruit), llegó muchísimo mas rápido de lo que esperábamos. Mientras bajaba el ide empecé a trastear y en media hora ya estábamos controlando Ardour. El sketch es recontra simple, está basado en arduimidi/ttymidi


Resulta que estaba en el FLISol 2011 de La Plata y bajo al primer piso para ir al baño. Estoy por entrar y un muchacho que salía me dice cuidado. Ambos retretes están ocupados así que espero haciendo morisquetas frente al espejo para matar el tiempo.
De fondo se oía un thud-thud-tap-thud-thud… Pensé que era un retumbe de la exposición del Hall pero luego me pareció muy familiar, y lamentablemente cercano. Alguien estaba preparando la cena de Acción de Gracias, comenzando por estrangular al pavo.
Carraspeo de una forma bastante evidente. – Si voy a pasar por un momento embarazoso no quiero estar solo, aunque no creo que le importe mucho a quien estaba dentro del cubículo. – Chirrido, puerta que se abre y el horror. Un ser bastante parecido a Soldán, me dice con voz algo espasmódica “pasá pibe, ya casi termino”. La próxima vez cruzo hasta el San Martín. No me importa que desinfecten cada dos horas.
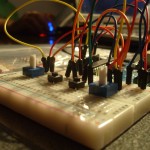
The LB1946 is a very nice chopper driver, the only downside is that it has a serial interface. So, for a project I need to control some steppers. I have a box full of printer boards, picked this one from and old epson inkjet because it had the same chips and also looks like I can chop it in half with a hacksaw and use them as they are.
The logic and the original power supply were toast so I used another I had at hand. To make some tests I hacked the PowerSwitch circuit from Objective Development to send raw commands and spin the motor with an usb interface.
At the end it doesn’t look quite like the original but it works. Still can’t get more than 1000 steps per second but I think that’s because of the supply. Now that I have the basic code working I’ll have to make a parallel interface so I can use them with EMC.

Or 11 years moving packets back and forth.
These are the remains of ‘Cachafaz’. It’s a very special computer for me. We bought it in 1999, it was my third computer, the second I’d put Linux into. Back then i called it ‘Garchake’ because I was using Mandrake. Lots of memories spring back… my first steps in C, hacking xmms plugins, countless hours playing Unreal Tournament (with windows ME, ewww). Amoung our friends it was pretty beefy, amd k6-3 400Mhz, 512Mb, 10gb hd plus the 2gb disk from my older computer, 56k modem and a Voodoo 4500…
Kernel 2.2.14
qt 1.44
KDE 1.1.2
Xfree86 3.3.5
Qué épocas!! Lo peor de todo es que estoy armando una máquina solo para correr nuevamente el cd.

cd de Corel Linux, 2000
…and hardcode cp1251 everywhere. Sigh.